In this post im going to show you how to move your WordPress site to a new host or domain. So, let’s get started!
Table of Contents:
- Step 1: Selecting a New Host
- Step 2: Creating a WordPress Backup from the Old Host
- Step 3: Uploading WordPress Files to New Host
- Step 4: Uploading the Database to New Host
- Step 5: Adding New Database Details
- Step 6: Change DNS Settings for the New Host
- Step 7: Testing the New Host WordPress Site
- Moving Domain to Another New Domain (Optional)
- Conclusion
Step 1: Selecting a New Host
Advertisements
The first step is to select a new hosting provider to move your WordPress site. There are many hosting services available, but better hosting your website on a Linux VPS. In my blog, have a dedicated post on how to install WordPress on a Linux VPS, as well as tips on optimizing performance with Redis Cache. Don’t forget to check out those posts for more detailed information.
Step 2: Creating a WordPress Backup from the Old Host
Once you have chosen your new hosting provider and set up your web server, the next step is to create a backup of your WordPress website from the old host. Most hosting providers offer cPanel, which allows you to easily create a backup. Make sure to create a full backup of your WordPress installed directory and database. You can use phpMyAdmin to create a database backup.
Step 3: Uploading WordPress Files to New Host
Access the FTP of your new host and navigate to the web directory. Upload the WordPress files to that directory.
Step 4: Uploading the Database to New Host
Create a database on your new hosting provider and make a note of the login details. Next, use phpMyAdmin to import the database backup you created earlier. Most hosting providers offer phpMyAdmin.
Step 5: Adding New Database Details
To establish a connection between your WordPress site and the new database on the new host, you need to update the wp-config.php file. Locate this file in the web directory of your new host, open it with a text editor, and find the following lines:
define( 'DB_NAME', 'newdbname' );
define( 'DB_USER', 'newdbusername' );
define( 'DB_PASSWORD', 'newdbpassword' );
define( 'DB_HOST', 'localhost' );
Replace ‘newdbname‘, ‘newdbusername‘, ‘newdbpassword‘, and ‘localhost‘ with the details of your new database. Save the changes.
Step 6: Change DNS Settings for the New Host
When you move your website to a new host, you must update the DNS settings to point to the new server. Log into your domain registrar Dashboard and update the dns settings. if you don’t know how to do it please check the registrar website for more info.
Step 7: Testing the New Host WordPress Site
After completing all the steps, Test your new WordPress site on the new host. Visit your website using your domain and check everything is work correctly.
Moving Domain to Another New Domain (Optional)
Advertisements
If you are also changing your domain, follow these additional steps:
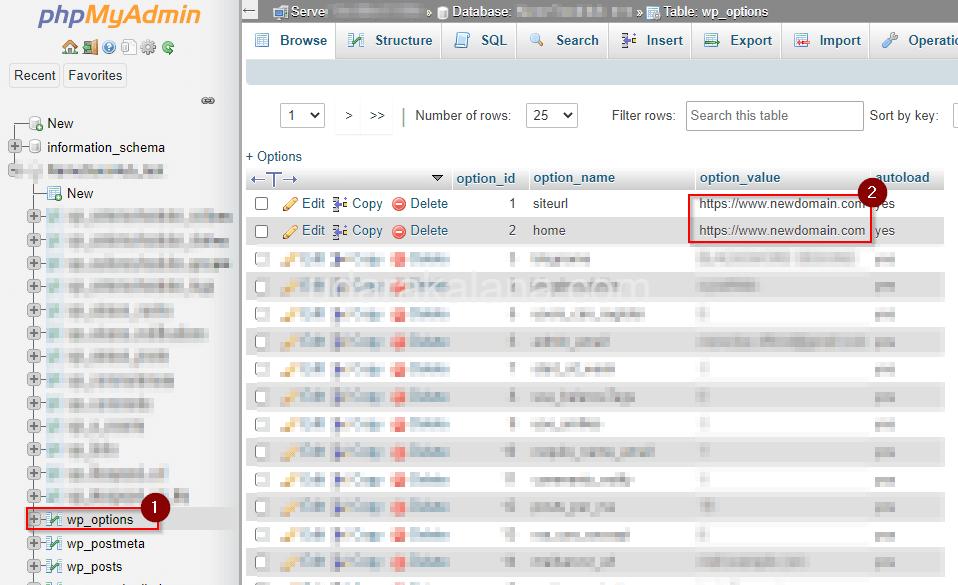
- Log in to phpMyAdmin and select your WordPress database.
- Go to the
wp_optionstable and locate the siteurl and home. - Update the values of these with your new domain.
- Save the changes.

Conclusion
With the help of this post, you can successfully migrate your wp website without any issues. Remember to create backups, upload files and databases, update the configuration files, and make the DNS changes. If you have any questions, feel free to leave a comment.


Thanks man