
In this post, I’ll show you how to install ClamAV on a Linux server and start a malware scan.
Table of Contents:
- Step 1: Update your package list
- Step 2: Install ClamAV
- Step 3: Update ClamAV
- Step 4: Scan your server
- Step 5: Schedule automatic scans
- Conclusion
Step 1: Update your package list
Advertisements
update your package list:
sudo apt-get update && sudo apt-get upgrade -yStep 2: Install ClamAV
sudo apt-get install clamav clamav-daemonNote: ClamAV’s clamd process may use a significant amount of memory(around 1.5 GB).
This command will install both the ClamAV antivirus program and the ClamAV daemon, which runs in the background and scans files for viruses automatically.
Step 3: Update ClamAV
After installing ClamAV, it’s important to update so it can detect the latest threats:
sudo freshclam
This command will download the latest ClamAV from the website and update your local copy of the database.
Step 4: Scan your server
You can run a scan of your server to check for malware:
sudo clamscan -r /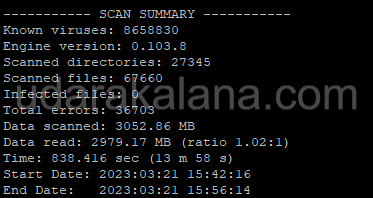
This command will scan your entire server and report any malware it finds.
Step 5: Schedule automatic scans
To ensure that your server stays protected, you should schedule automatic scans with ClamAV. To do this, create a cron job that runs the clamscan command at regular intervals. For example, to run a daily scan at 2am:
sudo crontab -eThis command will open the cron table editor. Add the following line to the end of the file:
you can change the scan time using this website.
0 2 * * * clamscan -r / > /var/log/clamav/scan.log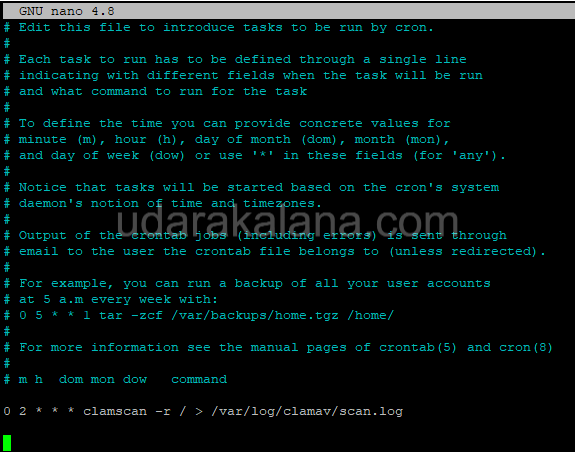
Advertisements
This will run a scan of your server every day at 2am and save the output to the file /var/log/clamav/scan.log.
Conclusion
installing and using ClamAV on your Linux server is an easy process that can help you protect your system from malware. if you have any issues about this post leave a comment thank you…


