
If you’re facing issues with your server’s RAM overloading, you might want to optimize it by pre-generating the world. In this post, I will explain how you can optimize your Minecraft server by pre-generating the world.
Before proceeding with the pregen process, make sure you have already installed and set up your Minecraft server on a Linux VPS. If you haven’t done so yet, check out my guide on how to install a Minecraft server on a Linux VPS.
Table of Contents:
- Step 1: Install the Chunky Plugin
- Step 2: Select the World You Want to Pre-Generate
- Step 3: Set the Radius of the Pre-Generated World
- Step 4: Start the Pre-Generation Process
- Step 5: Pause or Stop the Pre-Generation Process
- Step 6: Add a Border to the World
- Conclusion
Step 1: Install the Chunky Plugin
To pre-generate your Minecraft world, you need to install the Chunky plugin. Chunky is a powerful tool that allows you to generate the world. You can download the plugin from the SpigotMC website.
Step 2: Select the World You Want to Pre-Generate
Advertisements
After you have installed the Chunky plugin, you need to select the world you want to pre-generate.:
chunky worldReplace “world” with the name of the world you want to select. For example, if you want to select the overworld, you would use the following command:
chunky world worldfor nether world and end
chunky world world_netherchunky world world_the_endStep 3: Set the Radius of the Pre-Generated World
Once you have selected the world, you need to set the radius of the pre-generated world. The radius determines the size of the pre-generated area. To set the radius:
chunky radius 6000Replace “6000” with the radius you want to set. This command sets the radius to 6000 blocks on all four sides.
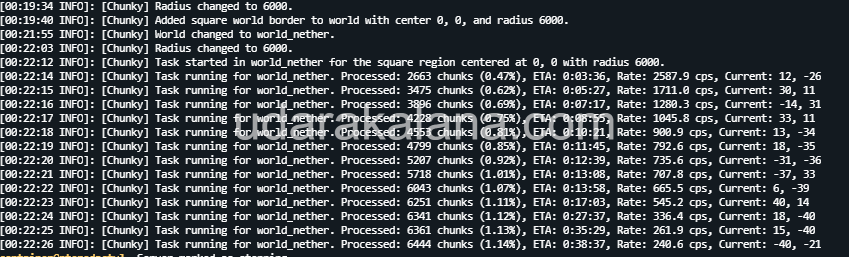
Step 4: Start the Pre-Generation Process
After you have set the radius, you can start the pre-generation process:
chunky startThis command starts the pre-generation process for the selected world.
Step 5: Pause or Stop the Pre-Generation Process
You can pause or stop the pre-generation process at any time:
chunky pauseTo continue the process:
chunky continueTo stop the process completely:
chunky cancelStep 6: Add a Border to the World
Adding a border to your world can prevent players from generating new chunks. To add a border to your world, you need to install the ChunkyBorder plugin. You can download the plugin from the SpigotMC website.
After you have installed the ChunkyBorder plugin, you need to select the world and set the radius as we did in steps 2 and 3. Then, use the following command to add a border to the world:
chunky border addThis command adds a border to the pre-generated world.
Advertisements
Big thanks to the developers of Chunky and ChunkyBorder plugins for creating such helpful tools for pregenerating Minecraft worlds and adding borders. If you find these plugins useful, be sure to leave a positive review for them on SpigotMC. Your feedback will help them continue to improve and maintain these plugins for everyone to use.
If you’re interested in further optimizing your Minecraft server, check out this guide. It provides useful tips and tricks to help you improve server performance and reduce lag. You can find more information.
Conclusion
pre-generating your Minecraft world can significantly optimize your server’s performance. By using the Chunky plugin, you can pre-generate your world and set a border to prevent new chunks from being generated. This will save CPU usage and improve your server’s overall performance. However, keep in mind that pre-generating your world takes up disk space, so be sure to think carefully before selecting a large radius.
