
In this post, I will guide you on how to install a Terraria server on a Linux server running Debian or Ubuntu. if you are looking for a place to buy server then check this website Linode starts with $100 free credits.
Update Your System
Update your system’s packages:
sudo apt update
sudo apt upgrade
Install Dependencies
The screen allows you to run multiple terminal sessions within a single window. It is useful for running background processes like game servers. install Screen and unzip:
sudo apt-get install screen unzipDownload the Terraria Server Files
Advertisements
Download the latest version of the Terraria server files:
wget https://terraria.org/api/download/pc-dedicated-server/terraria-server-1449.zipyou can find the release versions here https://terraria.fandom.com/wiki/Server#Downloads
Unzip the Server Files
Unzip the server files:
unzip terraria-server-1449.zipRun the Server on Screen
Navigate to the Terraria server directory:
cd 1449/LinuxStart a new Screen session using the following command:
screen -S terrariaStart the Terraria server on the Screen session:
./TerrariaServer.bin.x86_64Note: If you encounter a permission denied error, run the following command to make the server executable:
chmod +x TerrariaServer.bin.x86_64Configure your server settings by following the on-screen prompts. You will be asked to set the server name, server password, maximum number of players, world size, and difficulty level.
Detach from Screen Session
To detach from the Screen session and leave the server running in the background, press the following key combination:
CTRL + A, D
This will detach you from the Screen session.
Reattach to Screen Session
To reattach to the Screen session and view the Terraria server console output:
screen -r terrariaAdvertisements
This will reattach you to the Screen session named terraria and show you the Terraria server console.
Connect to the Terraria Server
Now that you have successfully installed the Terraria server, you can connect to it using the Terraria game client. Simply launch the game client and click on the “Join via IP” button. Enter the IP address of your server and the port number that the server is running on (by default, this is 7777), and click “Join”. You should now be connected to your Terraria server!
Conclusion
By following these steps, you should now have a fully functional Terraria server that you can enjoy with friends and other players from around the world. If you have any questions leave a comment and share this post with your friends.


Hey i just found your post on steam discussions. how can upload my old server world file, after installing server using your guide ?
First, log in to your VPS (Virtual Private Server) using SFTP (Secure File Transfer Protocol). You can use any SFTP client, such as FileZilla or WinSCP, to connect to your VPS.
Once you’re logged in, navigate to the /.local/share/Terraria directory. This directory can be found in the root directory of your VPS.
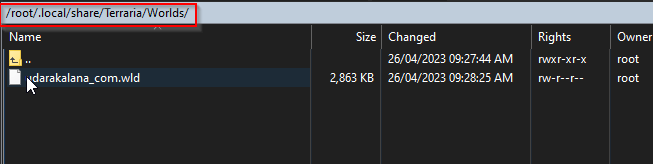
In the Terraria directory, you’ll find a folder named “Worlds.” This is where you need to upload your old world file. Simply drag and drop the “worldname.wld” file into the Worlds folder.
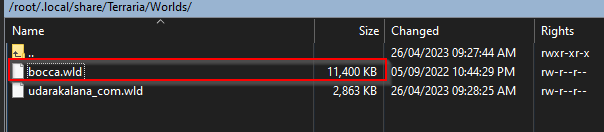
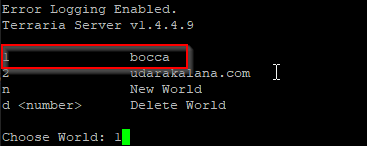
After uploading the file, you can start your server. When you run the server, you’ll see a list of available worlds. Select the world you just uploaded, and start the server.
I hope this helps you to upload your world file to your newly installed Terraria server. Let me know if you have any other questions
thank you so much !!!